Product Description
M2000 System
Equilibrium of chamber temperature and RH less than 10 minutes
Chamber control probe maintains accurate calibration for 12 months
Accurate system calibration includes controllers and probe characteristics
Direct control readout of RH and temperature eliminates conversions or calculations
Precise control of RH and temperature using direct input from the internal probe
Lightweight and transportable for immediate in-plant and laboratory RH calibrations
Temperature compensated control probe means high accuracy over wide RH range
RS-485 output (optional) for computer control of automatic ramp and soak cycles.
Introduction
The Model 2000 is a low cost, high accuracy alternative to RH calibrations that use chilled mirror or 2-pressure systems, and is faster than procedures using saturated salts. The system incorporates advanced electronics and innovative approaches resulting in an overall improvement in performance and reliability.
The system design provides a capability to perform calibrations of chart recorders with remote probes or do a simultaneous linearity test of multiple data loggers. The Model 2000 can also be used for a fast assessment of dew point instruments.
Unlike larger systems, the Model 2000 reaches equilibrium within minutes, thus enabling a full range calibration in much shorter times. The flexibility of the system gives laboratories a means for continuous calibration while larger systems are being used for other tasks requiring extended calibration times.
The Model 2000 measures and controls RH directly. This eliminates the need for any conversions or computations that often lead to additional errors.
In general, the Model 2000 Humidity Calibrator will generate chamber conditions for accurate and repeatable calibration of instruments, probes, recorders and data loggers.
Theory of Operation
The system produces proper humidity values by continuously monitoring chamber conditions with a very accurate internal probe. The probe measures both the RH and temperature, then sends this information back to microprocessor based controllers. Internally there are 2 pumps connected to a closed-loop system, one pump for dry air and the second for wet-air. The controllers call for wet or dry air and the pumps respond accordingly. This results in very precise, very fast response for chamber stability. A high volume turbo-axial fan inside the chamber gives the uniformity of RH and temperature.
System Description
The Model 2000 uses digital control for fast response and stability. The controllers are microprocessor based and are programmed for optimum performance for the application. A very accurate probe is installed inside the chamber to measure humidity and temperature. The probe is calibrated against a 2-pressure calibrated standard.
The chamber is sufficiently large to accommodate several data loggers and also can accept multiple probes for simultaneous calibrations. Dimensions are 6″ (125mm) in diameter and 9″ (225mm) overall depth, with a useable depth of 6″ (125mm). To reduce the effects of outside temperature the chamber is wrapped with several layers of foam insulation. Chamber doors are interchangeable and are easily removed and installed.
Air within the chamber is circulated by a turbo-axial fan having high CFM air flow. This air movement assures optimum uniformity of the humidity and temperature within the chamber and prevents any possibility for temperature stratification.
The saturator (wet air) and desiccant (dry air) are connected as closed-loop systems that recirculate the air in the chamber on a demand basis. This results in longer periods between the replacement or regeneration of wet/dry components.
System Performance
Typically, the Model 2000 will reach stability within 5 minutes for a 30%RH step change after reaching temperature equilibrium. As the humidity level increases the system must work a little harder therefore the settling times will increase to about 8 minutes. There is very little difference in the response times for increasing or decreasing humidity values, even when operating at a high controlled humidity for long periods.
Response time for temperature will vary depending on an increase or decrease in settings. Measurements have shown that when starting at 23C the rate at which the temperature decreases will be about 1 degree C/minute. The response rate when increasing from 23C to the highest value will be about 3 degrees C/minute.
Chamber Calibration of Humidity and Temperature
Prior to installation all probes that are used within the chamber are calibrated against a reference standard that has been calibrated using a 2-pressure system with an accuracy of +/-0.5%RH. Calibration is done by an Accredited NVLAP Certified laboratory. The operating and control probes are measured at 3 values of humidity, low, mid and high, and adjusted to be within +/-0.2%RH of the standard. Temperature is also adjusted to the accuracy of a precision thermometer or precision calibrated sensor.
After the probe is installed inside the chamber a multi-port test door is mounted. This door is designed to check the uniformity and stability of the chamber, and to do a final It systems” calibration. The procedure is to install the “primary” standard into the chamber to a depth of 6″ (125mm). The chamber control is then set at a mid RH value and the chamber is stabilized for 30 minutes when control is within +/-0.1. The reading of the standard probe is then compared with the reading of the internal probe as seen on the controller display. If there is any deviation the chamber reading is adjusted using the calibration capabilities of the controller. The chamber readings are then checked at the low and high RH values, allowing at least 1 hour at each point to assure stabilization. Readings are typically less than +/-0.2 over the entire range of measurement.
The same procedure is used for setting the temperature of the chamber. The temperature set point is 23C. Any deviation from the standard reading is corrected with adjusted of the controller to be within +/-0. 1 of the reference standard.
Chamber Uniformity Test
After the chamber has been calibrated for humidity and temperature at the 3 RH values the chamber is brought back to 23C and 50%RH. Again the system is stabilized for 1 hour. The test door has 4 positions to check each quadrant of the chamber. The primary standard probe is moved to 5″, 4″ and 3″ depths at each position and after chamber stabilization readings are again taken. Uniformity of chamber is typically +/-0.1C in temperature and +/-0.2%RH.
External Reference Instruments
The procedure for calibrating the Model 2000 is based on the use of an accurate reference instrument. For factory calibration the NVLAP calibrated primary probe is used. However, it is possible for the customer to establish a calibration of the chamber using in-house standards. An example would be to use a chilled-mirror instrument that is connected to the sampling ports of the Model 2000. In this instance a sample of the chamber conditions is pulled through the chilled mirror and RH is read as a computation from the dew point reading. As with any method that requires a conversion to compute another parameter, there is additional error because of the calculation formula.
For this reason it is recommended that the Model 2000 use a direct reading of RH instead of a conversion, and if dew point is the required parameter that a dew point instrument be used to give a direct reading.
Model 2000REF Instrument
The Model 2000REF is a versatile instrument that automatically calculates dew point based on the RH and temperature input. Although this reference does not have the highest dew point accuracies, as the expensive chilled-mirrors or similar systems, the accuracy is often suitable for routine tests and checks of dew point transmitters and probes. The Model 200OREF is very inexpensive, costing less than 1/10th than the cost of dew point reference instruments.
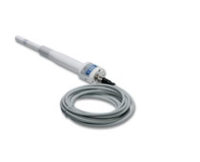
The Model 2000REF consists of a RH/T probe calibrated against the NVLAP standard probe and a hand held display instrument with internal microprocessor to convert the RH/T values to dew point. The algorithm used is based on ASTM formula.
Annual Calibration Procedures and Recommendations
There are several methods for having the annual calibration performed. These are the procedures that can be followed.
The internal probe used in the chamber has been selected because it is ASIC based and offers a unique advantage. The electronics is ASIC (Application Specific Integrated Circuit) with memory to store calibration data. This enables the user to just send the probes to a laboratory already set up to perform the calibration of such probes.
Thunder Scientific has a calibration procedure for these probes. The calibration uses the 2-pressure generator and compares “as found” and “as left” data. Thunder can supply all the necessary documentation for Certification and Calibration Certificates.
For simplified calibration procedures use of the Model 200OREF offers convenience and flexibility. It involves sending the entire instrument to a laboratory qualified and certified to perform a humidity calibration or because it is a self-contained reference package calibration can be done using in-house standards (such as a Thunder Scientific 2-pressure generator). The laboratory inserts the probe into the humidity chamber and using the internal software a complete check and calibration of the Model 200OREF can be done. All “as found” and “as left” tests can be done internally.
Data Output and Serial Communications
The standard auxiliary output of the Model 2000 is a 0-5V analog output. The output shown is the measurement of the internal reference probe. The 0-5V signal corresponds to 0-100%RH and -40 to +60C. The output will drive a recorder or similar instrument.
As an option the Model 2000 can be supplied with RS-485 output. This enables the customer to integrate their own software and programming to satisfy the measurement requirements for linearity or calibration of devices.
When the RS-485 option is purchased the user can also purchase the software and programming for specific tests at specific cycles. An extremely wide range of procedures for automatic linearity tests can be easily entered by the customer. The program is very easy to operate and offers an enormous amount of flexibility to the metrology group.
Calibration Certificates and Documentation
The primary standard used at the factory for all calibrations are the probes that have been calibrated by Thunder Scientific in the 2-pressure generator. Once again, Thunder Scientific is a Certified Accredited NVLAP company. The primary standards are used to perform a final system calibration. A Certificate of Calibration for the internal probe and the primary probes are included with each system.
Summary
The Model 2000 is a high accuracy system with specifications and performance that is equal to or better than some systems costing considerably more. It offers simplicity of operation, fast response, high accuracy, low maintenance and affordability. Because of increased productivity due to faster turn around times the Model 2000 offers the user considerable cost savings for everyday, routine humidity calibrations.
SPECIFICATIONS*
Humidity Range @ 23C
Temperature Range
Accuracy of RH Control Probe@23C
Overall System Accuracy
Temperature Accuracy (15-30C)
Chamber Humidity Stability @ 23C
Chamber Temperature Stability @ 23C
Chamber Humidity Uniformity @ 23C
@ 23C
Chamber Temperature Uniformity @23C
Response Time @ 23C
Temperature Rate of Change @ 23C
Temperature Rate of Change @ 23C (increase)
Sampling Ports for External Flow
Power Requirements
Mechanical Weight
Weight (shipping)
Dimensions
Output Signals
Calibration Door (basic standard)
Reference Probe Calibration
Chamber Calibration Adjustment
Calibration Certification
10-92%RH (controlled range)
10-50C (controlled range)
+/-1.0%RH (10-90%RH)**
+/-1.25%RH to +/-1.5%RH ***
+/-0.2C or better
+/-0.2%RH
+/-0.1C
+/-0.3%RH (10 to 90%RH)
+/-0.4%RH (>90%RH)
+/-0.1C
5-7 minutes for 30%RH change
1.0 degrees C/minute (decrease)
3.0 degrees C/minute (increase)
Customer Controlled Flow Rate
110/220VAC, 50/60 cycle
26# (13kg)
30# (15kg) (shipping)
18 W x 14.5 D x 8.5 H
(45cm x 36cm x 21cm)
Analog, 0-5V, RH and Temp
RS-485 (optional add-on)
4-Port for Uniformity and Stability
2-pressure Calibrated Probe
2-pressure Calibrated Probe
NVLAP****


